Every second counts when someone isn’t breathing, and knowing how to open the airway can save a life. Opening the airway is one of the first and most important steps when giving rescue breaths. Without a clear airway, air cannot reach the lungs, and rescue breaths will not be effective. For a single rescuer, using the right technique makes it easier to deliver breaths safely and efficiently while managing the situation alone. Following proper CPR guidelines ensures that every action, from opening the airway to giving breaths, helps the person get the oxygen they need and increases their chance of survival. Learning these steps and practicing them can make a big difference in an emergency.
The Critical Role of Airway Management When Performing CPR Alone
When performing CPR alone, keeping the airway open is one of the most important steps. A clear airway helps your rescue breaths reach the lungs and gives the person the best chance to survive.
- Keeps the Lungs Clear: A clear airway allows air to flow into the lungs easily. If the airway is blocked, rescue breaths won’t reach the lungs, making CPR less effective.
- Delivers Oxygen to the Body: Opening the airway ensures oxygen gets to the heart and brain. This helps the person stay alive longer while waiting for help to arrive.
- Makes Breaths More Effective: When the airway is properly positioned, each breath goes in smoothly. This helps the lungs fill and improves oxygen delivery.
- Helps a Single Rescuer Work Efficiently: Using the right technique makes it easier for one person to manage both breathing and chest compressions. It reduces stress and keeps CPR consistent.
- Follows CPR Guidelines Safely: Proper airway management follows the recommended steps in CPR. This increases the chance of survival and lowers the risk of injury.
How Can You Ensure a Clear Airway Before Giving Breaths?
To make sure the airway is clear before giving breaths, quickly check the mouth for any visible objects, food, or fluids that could block airflow. Gently remove anything you can see with your fingers, but avoid sweeping blindly as it may push the object deeper. Once the airway looks clear, use the head-tilt, chin-lift or jaw-thrust method to open it fully. This simple step helps your rescue breaths reach the lungs and keeps oxygen flowing.
Techniques a Single Rescuer Can Use To Open The Airway In Emergencies
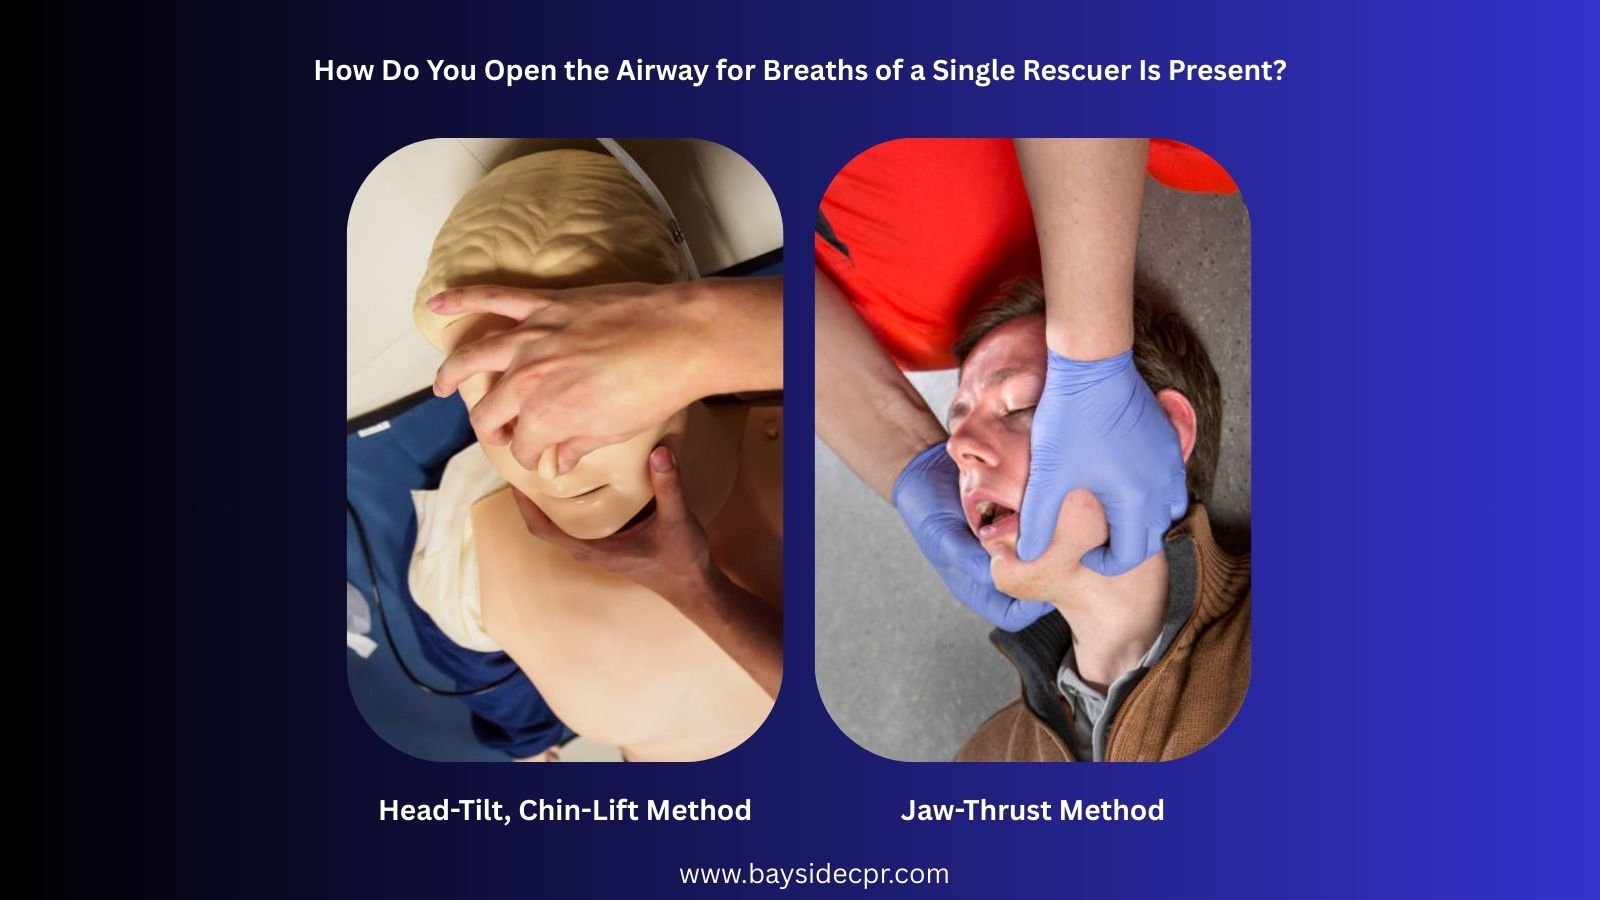
The head tilt-chin lift maneuver and the jaw thrust maneuver are techniques used to open a person’s airway, especially in the scenario of a single rescuer.
1. Head-Tilt, Chin-Lift Method
If there’s an emergency and someone isn’t breathing, a single rescuer can quickly open the airway using a simple head tilt and chin lift. This method tilts the head back and lifts the chin to clear the airway, which is easiest when we don’t think a spinal injury is present. It’s straightforward, practical, and buys time until rescue teams arrive.
1a. Position The Victim
Lay the person on their back on a firm surface. Make sure their head, neck, and body are aligned so you can easily open the airway and give breaths.
1b. Place One Hand on The Forehead
Gently rest one hand on the person’s forehead. This helps you tilt the head back without using too much force.
1c. Lift The Chin
Use your other hand to lift the chin upward. This movement lifts the tongue away from the back of the throat and opens the airway for breathing.
1d. Clear The Airway
Check the mouth for any visible objects, fluids, or debris. Remove anything you see so air can flow freely into the lungs during rescue breaths.
2. Jaw-Thrust Method
In an emergency where someone isn’t breathing, a single rescuer can act quickly to open the airway. The jaw-thrust method helps lift the tongue and open the airway without tilting the head, especially when a spinal injury might be possible. This technique focuses on keeping the neck safe while creating a clear path for the person to breathe. It’s simple, direct, and aimed at helping until more help arrives.
2a. Position Yourself Over The Victim
Kneel close to the person’s head so you can reach their jaw easily. This position gives you better control while keeping the head steady.
2b. Place Your Hands
Rest your palms on each side of the head and place your fingers under the jawbone. This hand placement lets you lift the jaw without moving the neck.
2c. Open The Mouth
Gently push the lower jaw upward to bring it forward. This action opens the airway and helps air move into the lungs.
2d. Clear The Obstructions
Look inside the mouth for any objects or fluids that might block breathing. Remove anything you see so rescue breaths can pass through smoothly.
Give Rescue Breaths
After you open the airway, the next step is to give rescue breaths that help bring oxygen into the lungs. Using the right technique makes each breath more effective and gives the person a better chance to recover.
- Positioning Your Mouth Over the Victim’s Mouth (And Nose for Infants): For adults and children, make a tight seal by covering the person’s mouth with yours while pinching the nose closed. For infants, cover both the mouth and nose with your mouth to ensure air goes in properly.
- Delivering 2 Effective Breaths: Give two slow breaths, each lasting about one second. Blow just enough air to make the chest rise, not too hard or too fast.
- Watching for Chest Rise to Confirm Ventilation: Keep your eyes on the chest as you give breaths. A gentle rise shows the air is reaching the lungs and the breaths are working.
Common Mistakes to Avoid
It’s easy to make small mistakes when providing rescue breaths, especially when you are alone in a stressful moment. Knowing what to avoid helps you give care more effectively and keeps the person’s chance of survival higher.
1. Over-Tilting or Under-Tilting the Head
One common mistake is tilting the head too far back or not enough when trying to open the airway. Over-tilting can block the airway, while under-tilting may not lift the tongue away from the throat. A gentle tilt with a chin lift is usually enough to keep the airway open and make each breath more effective.
2. Not Sealing the Mouth Properly
If the mouth is not sealed tightly, the air you give may escape instead of reaching the lungs. Make sure your lips cover the person’s mouth fully, and if it’s an infant, cover both the nose and mouth to create a secure seal for effective breaths.
3. Giving Breaths Too Fast or Too Slow
Breaths that are too fast can push air into the stomach instead of the lungs, while breaths that are too slow may not provide enough oxygen. Aim to give each breath gently over one second, just enough to see the chest rise.
4. Neglecting Compressions in Cardiac Arrest
Focusing only on rescue breaths and forgetting chest compressions is a serious mistake during cardiac arrest. Compressions keep blood moving to the brain and heart, so they must be done along with breaths to give the best chance of survival.
Critical Airway Tips Every Solo Rescuer Should Remember
In short, opening the airway properly is key when you are the only rescuer. By using either the head-tilt chin-lift or the jaw-thrust method, you clear the path for air so rescue breaths can reach the lungs and oxygen can flow to the heart and brain. Stay calm, act quickly, and follow CPR steps step by step, check the mouth for obvious blockages, open the airway, and deliver two steady breaths while watching the chest rise. Remember to keep chest compressions going if the person isn’t breathing or you’re trained to do both, and avoid common mistakes like over-tilting or sealing the mouth poorly. Practicing these skills builds confidence and can save a life when it matters most.